
Some of you may know the very affordable alarm system Olympia Protect 9061. I'm using it since several years. It offers a variety of sensors for a reasonable price and has also a built-in GSM module for turning alarm on and off via phone call and also informing that there is an alarm. Beside the siren of course.
In case you are living in one of those countries, which took down the GSM mobile network recently to free some frequencies for new mobile standards, you probably also face the issue that you cannot even turn the alarm system on and off remotely anymore.
Here is what I did about it.
Here is what I did about it.

The moment the GSM network was switched off, the display begun to show a SIM error. Everything else still worked, accept all things which involved a GSM connection.
The system as such has a promising USB connector on the backside. But to cut a long story short: no data to listen to on that one. I don't even know if it really is an USB connector or if they just used the socket and it is electronically something totally different.
And in the whole internet you won't find any description about the hardware and/or firmware, which could provide an insight, if and what could be done via this connector.
Next stop: the remote
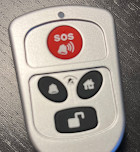
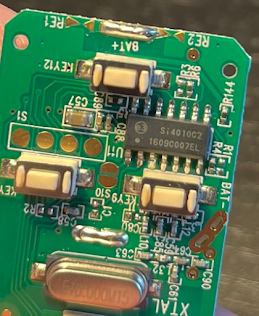
So let's check out what's inside this guy.
The first thing, that came into my mind: this is made for linking it to a Sonoff Basic R1 module. (I'm talking about these kind of modules here. I don't get sponsored by the way. ;-)
So we are making my good old Olympia Protect alarm internet-ready with just $5. :-)
Next step is now: take the sonoff out of its enclosure, flash it with Tasmota (MQTT TLS version) and then connect it directly with the remote, as they're both talking 3.3 volt logic, which saves us additionaly circuitry - easy!
So the basics are: the sonoff module is also providing the power supply for the Olympia remote, so we do not need its battery anymore. After flashing the sonoff board, we connect the tx and rx pin with the alarm on and alarm off button. Of course with the side, which is not battery (-) but the input of the chip.
Put it altogether in an old enclosure (who guesses right what was in there before?) it and it looks like this:

As it was a sonoff R1 board, with in total 5 pins on the extension connector (+,-,Rx,Tx, GPIO14) I also integrated a temperature sensor.
On the upper part there is the Olympia Protect remote board. I've connected only 2 buttons. Alarm on and off. If you hold the remote board upright (led is on top) you need to solder the wire on the left side of the button, right side is connected to ground.

Now it is necessary to configure the sonoff/tasmota module a bit: GPIO1 and GPIO3 (the two serial port pins on the sonoff board) will be configured as relay 2 and 3. It is important to chose the inverted type. (Relay_i) We remember: the ports of the SI4010C2 chip on the remote are active low. That's also why the buttons of the remote are switching them to ground, if pressed.
On the other pin I've configured a temperature sensor. But as mentioned that is only optional and has nothing to do with the remote function.

After the configuration the sonoff web gui shows now 3 buttons. The first one is the built-in relay and can be used to switch anything else on mains.
The second and third button are for switch ing the Olympia Protect Remote to activate and deactivate the alarm.
To make operating it a bit more convenient, I've set the commands
pulsetime2 70 and
pulsetime3 70
on the console of the tasmota web gui.
With that the two ports are only activated for 0.7 seconds if one presses the second or third button, which is sufficient to send out the command to the alarm system via remote.
Otherwise one would need to click the button a second time to switch off sending.
Last steps are setting up an MQTT server with TLS encryption in the internet, and configuring Tasmota to connect to it. I've chosen fingerprint validation here and used self signed certificates on the server site. This allows certificate expiration dates of 20 years or more.
To offer a web gui which I can easily use from my mobile phone I've installed Node Red on the server with a very easy flow to control the remote, the relay and to see the temperature of the sensor. As an add-on I've also integrated a timer, allowing for programming the alarm times of the Olympia Protect:
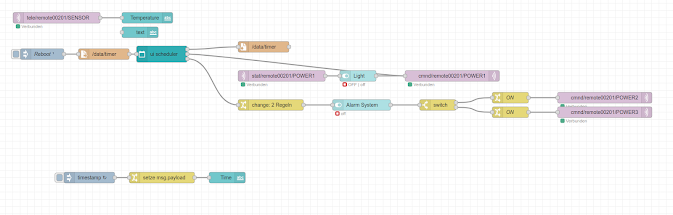
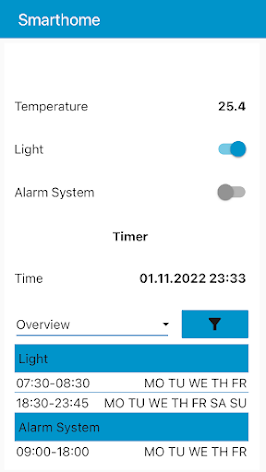
And finally we have a remote control on the mobile phone allowing external access to the alarm system from the internet to switch it on and off.
Of course it requires a few additional security measures, like making the Node Red instance only availble via a reverse proxy that ideally secures the access with a client site certificate.
For those of you who are more familiar with Node Red you may wonder why client site certificate and not simply protect Node Red dashboard with a password?
Two reasons:
First, with password I would need to setup fail2ban to stop brute force attacks on the Node Red login.
First, with password I would need to setup fail2ban to stop brute force attacks on the Node Red login.
Second, I don't want to start remote controlling my alarm system by typing in passwords if I open the webpage on my mobile phone. It should just work and be secure at the same time.
And done! With a bit of soldering, a piece of software we've managed to get Olympia Protect online. A bit online at least. :-)

Comments
Post a Comment